Saturday, July 16, 2022

Mirror Fold with the Fancy Folds Team


It’s July and winter in tropical Far North Queensland, which usually means about 2 cold days and nights, and we have just had them - 2 nights with temperatures under 10 degrees (C), and it was cold!

Yesterday was our annual show holiday and I took my girls to the show and spent all day there. Perfect whether to spend a day at the show, only about 20 degrees, but we still managed to get sunburnt and the wind was very cold while we waited for the fireworks, lucky we brought the winter jackets.

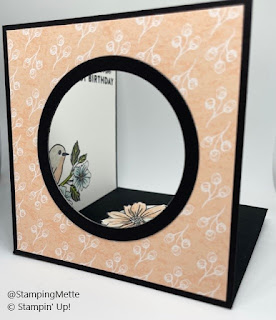
So, this months fancy fold is a mirror fold, and I love it. I have never made one of these folds before, but I will be making more, I really enjoyed it.

This tutorial from the Artful Inker is a good place to start for this card, however I also took some inspiration from Susan Wong from the Crafty Carrot Co, who did this same card in a slimline version, so that’s what I did.

You start with a 10.5 by 8” piece of cardstock. On the 10.5 side you score at 3.5 and 7. Then mark 2” down on the first score line and make a score line to the corner and the next fold.

Then you make a mark 2” up on the second score line and score to the corner and the next fold. If that makes no sense, watch the video 😊


You then fold the first one back and the second one to the front. That is your card base. Mine is Orchid Oasis.

I the cut a piece in same colour at 3 1/8 by 7 5/8 for the front panel then lay in place and mark where you need to cut to get the perfect fit. The score lines take up a bit of room, so it is hard to give precise measurements.

I ink blended this front panel with Orchid Oasis ink and did some splatters in same colour.


I also cut a piece from the Wonderful World DSP with same measurements to fit on last panel. The middle panel is a bit tricky to give measurements for, so I just cut a piece in same side and then marked and cut to fit. This panel is also from the Wonderful World DSP.

I fussy cut a flower from the same DSP and stamped some flowers from the coordinating stamp set. I stamped these with markers in Daffodil Delight, Melon Mambo, Orchid Oasis and Pear Pizzazz on Shimmer White card stock. These were also fussy cut. Both the front flower and the middle panel flowers are layered on a Basic White circle. I stamped some words in Versamark on Starry Sky and heat embossed with white.


I finished it all off with a silver brad and Linen Tread.


Hope you like it and have a go. It is pretty easy, when you get started.

I hope you enjoyed this fold and card and leave a comment below, so I know you stopped by. Also, please keep hopping to see the other great creations from the team. Gina is next, so hop on over and check out her card 😊

The current host code is ARZ7SNYW, make sure to use this for a little gift from me.

The July-December mini catalogue is now live and you can order from it. There are lots of exciting new products and there is sure to be something to cover your Christmas needs. There is even a stamp set more appropriate for our warm Australian summers.

It is also Sale-a-Bration which means you can earn more free product. For every $90 you spend you get to pick a level 1 reward and for every $180 you can pick a level 2 reward - see all the items here.

If you are in Australia and would like to join my team, now is a great time as it is Sale-a-Bration and you get the exclusive planner for free.


Please leave a comment, so I know you stopped by.


Happy Stamping!


Saturday, June 18, 2022

Diamond Z fold with the Fancy Folds Team


It's June and we are almost half way through the year 😱

This month we are doing a Diamond Z fold. I have not tried one of these before, but it is an easy one to do, and such a great display card when it is finished. This card is a bit bigger than a standard card, at 7 x 5 inches, but it can easily be modified to a standard size card, you just need to make the diamonds smaller.

I followed this tutorial by Jan B, it is a pretty long video, but there are instructions below the video and you can skip the decorating parts to just get to the parts you need.


I used the new Sun Prints suite which is beautiful.

I used Basic Black card stock for the base and one of the Gray Granite patterns and as my main pattern and one of the blue patters, both from the Sun Prints Designer Series Paper, as my accent pieces, both layered on Basic White.

I stamped the big leaf image and the flower image from the Nature's Prints stamp set in Versamark on Basic Black and heat embossed with Silver Embossing Powder. I cut these out with the matching Natural Prints dies and also cut a few extra leaf pieces in Basic Black.

I stamped one of the greetings from the stamp set in Night of Navy on Basic White and layered it on Basic Black.

This is a great fold and not difficult at all. The cutting of all the DSP and card stock is the most time consuming part 😊

This card is a stunner when it is standing up and the diamonds line up neatly.

I will add a piece of Basic White card stock to the back of the card to write on, when I am ready to send the card.

I hope you enjoyed this fold and card and leave a comment below, so I know you stopped by. Also, please keep hopping to see the other great creations from the team. Gina is next, so hop on over and check out her card 😊


The current host code is SKEUQAKC, make sure to use this for a little gift from me.

If you are in Australia and would like to join my team, now is a great time as you can order from the new July-December mini catalogue, that goes live to customers from 1 July 2022.

Last change list is out for the January-June mini catalogue, so make sure to order now not to miss out. There are some great discounts on offer.

This month is also the great BOGO kit sale - buy one and get one half price - you can even get the most expensive one at half price. Ensure you enter the cheapest kit first as the 50% is taken off the second entered kit.


Please leave a comment, so I know you stopped by.

Happy Stamping!


Saturday, May 21, 2022

Double Dutch Fold with the Fancy Folds Team

It's May and I hope you are ready for another round of fancy folds :-) This time the Fancy Folds Team is doing the double dutch fold. 

It's funny how we are often intimidated by fancy folds and yet usually they are super easy. This one is another super easy fold. I used this video tutorial by Splitcoaststampers - it is so easy that the video is less than 3 minutes 😃

You take half a sheet of cardstock cut the long way, score it in half and cut a smidge of one of the sides approximately 1/16" or 2mm. Then you cut a piece of your front card flap. The tutorial says to cut 2" off, but as I am using A4 cardstock which is longer than 8.5"x11" I cut 2.5" or 6.5cm off. I felt that balanced the card better.

You then cut another piece of cardstock that is same height as what you cut off and the width of a sheet of cardstock (8.5" or 21cm) . For me this piece is 6.5cm by 21cm. Stick it to the bottom back of your card and wrap it around to give you the 2 gates.

My base card is Basic Gray and I layered it with Fresh Freesia. I used the Garden Green piece from the Heart & Home DSP pack.


I stamped the smaller flower image from the Blessings of Home stamp set in Staz-On ink on watercolour paper and water coloured the image with Fresh Freesia, Garden Green, and Mango Melody ink. After it dried I die cut the image with the matching Flowers of Home dies and gave the flowers some Wink of Stella.

I popped the flower image up onto a die cut in Basic Gray cut with a label die from the Painted Labels die and a Fresh Freesia circle. I then added a few Basic Rhinestones to the card.


On the inside I added a piece of Basic White cardstock and stamped the same image in Basic Gray in the corner.


Don't forget that the new annual catalogue is now live.

The current host code is AHWCWBZG, make sure to use this for a little gift from me.

Let me know if you would like a copy of the new catalogue.

If you are in Australia and would like to join my team, now is a great time with the in-colour offer. $169 to join and in addition to the usual $235 worth of product you also get a selection of 2022-2024 in colour products for FREE! Only available until 31 May 2022.

I hope you have enjoyed today's card and that you continue the hop to see what Gina has come up with this month.

Please leave a comment, so I know you stopped by.

Happy Stamping!


Saturday, April 23, 2022

Double Triangle Fold with the Fancy Fold Blog Hop team


We are almost through April April and it is time for another hop with the Fancy Folds Team. You may have come from Teresa's page, welcome, she makes beautiful cards.

This month we are making the Double Triangle Fold and I have used this Splitcoaststampers' video tutorial by Dawn Olchefske

The tutorial is easy to follow. You cut the paper in half diagonally and get 2 cards, depending on which way you cut you get different openings of the card. The cutting can be difficult to do depending on your trimmer, but it can be done with scissors.

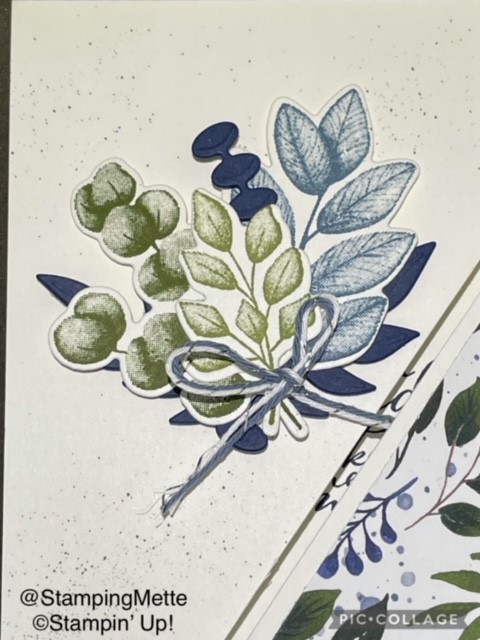
When I first set out to create for this hop I had not yet received my pre-order from Stampin' Up! containing all the new 2022-24 in-colours and new stamp sets which were available on pre-order for demonstrators, so used an old stamp set. I do love this set, Forever Fern, and the matching dies, Forever Flourishing. Both of these will carry over to the new catalogue going live on 3 May 2022.

I used a Basic White card base and  Beauty of the Earth designer series paper, which is part of the Beauty of the Earth suite. This paper is still available in Australia at a great discount, so get in quick before it is discontinued or sells out.

I cut the designer series paper in a rectangle 1/4" smaller than the standard card front, and cut it in half diagonally.


I stamped some of the images from the stamp set in Night of Navy, Old Olive and Mossy Meadow. I cut these out with the matching dies. I also die cut 2 other pieces in Night of Navy cardstock, these dies does not match any stamps in the set. I clustered the leaf images together and finished off with a little bow with twine from the Flowers for Every Season ribbon pack. This twine is made up of Misty Moonlight and White twine twisted with a silver tread.

I finished the card off with a bit of ink flicked on with Stampin' Write Markers in the same colours as i stamped.


My pre-order finally arrived and I thought I would make another card, just so I could have a play with the new in-colours.

I again used a Basic White card base. I then layered on half the card with the new colour Starry Sky and Parakeet Party designer series paper. These colours are VERY bright in person.

I used the new stamp set Bottled Happiness (available 3 May 2022) and stamped the bottle in Starry Sky ink. I stamped the floral image in Orchid Oasis and Parakeet Party. This is a two-step Photopolymer stamp set and easy to line up. There is a punch to match the bottle image, but I don't have this yet, so I fussy cut the bottle as well as the flower image.

I stamped the flower image again and cut a couple of extra flowers out and popped these up with dimensionals for a bit extra interest.

Again I flicked some ink on the white card, this time Starry Sky.


I was great having a play with these new colours. I really like them all, but together they are very bright. I think I might need to tone them down a bit with some neutrals, when using them, but they are fun.


There are still great discounts to be had on the retirement/last change list for the 2021-22 annual catalogue, check these out here.

The current hostcode is Q4CNNRSK, so make sure to use this for a little gift from me.

And if you have shopped with me this last year, you will be getting a complimentary catalogue as soon as I have them. If you haven't shopped with me before and are in Australia, let me know and I will get one to you. 

I hope you enjoyed today's post and that you continue the hop, to see what Gina has come up with this month. Please leave a comment below so I know you were here.


Saturday, March 26, 2022

Impossible card with the Fancy Fold Blog Hop team

Time for another hop with the Fancy Folds Design Team and this time around it is the fun impossible card, which is not that impossible after all 😃

It has been a very long time since I last created a card with this fold, so it was fun to do revisit.

I used this video tutorial from Dawn Griffith and it was easy to follow.

Again this month I chose to make more than one card.

The first one uses the Cactus Cuties stamp set.

I am not that into cacti and plants and this stamp set was not one that caught my eye when the catalogue came out, but I bought it, and it is a lot of fun.

For this card I used a Evening Evergreen base and layered with Calypso Coral before adding a DSP layer. On the pop up I didn't add dsp but added a piece of Basic White.

On a scrap piece of Basic White I stamped the pots and the cacti. For the pots I first applied BumbleBee ink to 2/3 of the stamp and then applied Calypso Coral ink with a dauber to the remaining 1/3 overlapping a bit to soften the change and a bit to the bottom. I used the same colours on the little flower.

For the cacti I first stamped with Old Olive and daubed with Evening Evergreen.

I fussy cut it all out and adhered with dimensionals.

I stamped the sentiment with Evening Evergreen on whisper white and added some polished dots to finish the card off.


Love how these cards pop up all by them selves.


For the next card I used a Magenta Madness card base, Night of Navy layer and then Abstract Beauty dsp.


I again stamped on a scrap piece of Basic White. This time I stamped the pots in solid Night of Navy. For the flowers I used Blushing Bride, which I stamped off, as it has a slightly brown tone that didn't quite fit with my dsp. I used a dauber and Magenta Madness ink to add the colour variation. The little cactus i stamped in full Just Jade and the flower in Magenta Madness.


I stamped the sentiment in Night of Navy on Basic White and again added some polished dots.


These cards are fun and quick to make so watch Dawn's tutorial and give them a go.

Do you know what this is?


This is a graphic depicting the new in-colours from Stampin' Up! for 2022-2024.

This also means that demonstrators now have access to the new catalogue, but we are not allowed to share just yet.

Finally this also means that the retirement list is out from the current Annual Catalogue. And that the 2020-2022 in-colours are retiring, this include BumbleBee, Just Jade and Magenta Madness that I have used on my cards.

Click here to go straight to the 'last chance product page' to shop.

The current host code is MVWMFEMV - don't forget to use it when shopping 

Also, don't forget the current 'Savings are in Bloom' promotions - the mini Stampin' Cut and Emboss machine is on special as well as select dies. Click here to access this promotions ended on 31 March 2022.


Thank you for stopping by today ðŸ’—, I hope you enjoyed today's cards and specials. Make sure you follow the hop around and check out the rest of the gorgeous creations from our super talented team 😀


Next up is Gina, so hop on over to check out her creation 


Saturday, February 19, 2022

Fancy Folds Blog hop February 2022 - Pop-up Card


First hop of the year with the Fancy Folds Design Team and we are doing a pop-up card.

I used this video tutorial from Creations by Jolan which was easy to follow even if it is not in English.

I have made a lot of different pop-up cards over the years, but I have never tried this one before, so nice to try something new. And I didn't just stop at one, I made 3 cards 😀

For the first card I wanted to use some of the free Sale-a-Bration DSP Sunshine and Rainbows ,free with $90 order (Australia) and used one of the more simple patterns in Flirty Flamingo, which I paired with Misty Moonlight cardstock and the Dragonfly Garden stampset.

You start with a 20cm x 20cm piece of cardstock and score at 10cm on both sides. On the top right square you add your piece of 9.5cm x 9.5cm piece of DSP. Then you cut a circle out from the middle of this square. You have to fold the cardstock to run it through the Stampin' Cut and Emboss machine, make sure you fold it the right way so you don't cut the other square as well. Then you score the diagonally opposite square and cut up one of the score lines as shown in picture below. Then you cut part of these triangle so you keep a little flap to glue down later.

I used the same circle die and one a size bigger to cut a Misty Moonlight circle to add to the front around the cut-out.


I cut a 9.5cm x 9.5cm piece of Basic White cardstock which I stamped in Misty Moonlight with the flower image from the stampset and also stamped the greeting. I 'stamped' a clear block in Flirty Flamingo ink and dipped my Wink of Stella pen in this ink to colour in the flowers in the image. I then used the Misty Moonlight ink to colour in some of the leaves.

I used the circle I had cut out and added it to the square that will be seen through the cut out circle. I stamped the dragonfly in Misty Moonlight and then coloured in with a Flirty Flamingo Blend  and added Wink of Stella on top. I punched this out with the Dragonfly punch and also punched a dragonfly from Misty Moonlight to add underneath the other one to add dimension. I popped this up with Dimensionals.


I added Tombow glue to the flap and folded the card over to clue together.


This is what the card looks like when folded.


And when it is open.


I made 2 more cards using items from the January-June mini catalogue and Sale-a-Bration.
One uses the same Sunshine and Rainbows DSP as well as the Rainbow of Happiness and Brilliant Rainbows dies and the Cloud punch. I used Bermuda Bay cardstock.


I punched a cloud and used as a stencil to blend the background with Balmy Blue ink to create a sky.


The last card uses the Friendly Hello stampset and DSP which is free with a $180 order (Australia). I used Basic Black cardstock and the Blushing Bride paper from the pack


I watercoloured several flowers with Blusing Bride and Pool Party ink and fussy cut them. I added Wink of Stella. I cut some of the petals off and layered them to give dimension. I coloured some leaves with Granny Apple Green and cut those out and put behind. I added them to a white circle using same size circle as for the cutout on the front panel.


On the panel inside I stamped the flower image and watercoloured it with Blusing Bride, Sahara Sand, Pool Party and Granny Apple Green. I also added Wink of Stella.


I hope you enjoyed this and try your hand at this fold, it is easy and lots of fun.

Hop along and check out the creations from the rest of the design team. Up next is Gina Connor, you can check out her creation here.


Don't forget all orders of $50 or more placed between now and 28 February 2021 will receive a gift if the hostess code is used.

February hostess code: RKJJH3E9


Saturday, December 18, 2021

Fancy Folds Blog hop December 2021 - Bay Window Card


So today I am partaking in the Fancy Folds Blog Hop where the fancy fold is a Bay Window Card.

This is my first hop with this talented team, and I cannot wait to see what they have come up with.

The Bay Window fold is great for lots of things, you can dress it up as much or as little as you like. It displays beautifully and it folds flat for postage.


I made my card bigger at 14.8cm by 14.8cm as I wanted to use the big frame in the Eden dies. The side panels are approximately 4.3cm and the middle around 5 which leaves that little 1.5 cm on the right to tuck under.


The card base is Soft Succulent layered with Basic White which has been embossed with the Evergreen Forrest 3D Embossing Folder to add some texture.

The big frame is cut in Evening Evergreen cardstock.


I stamped the large flower stamp from the Eden's Garden stamp set in both Soft Succulent and Evening Evergreen and fussy cut them both out and layered slightly off-set.


I didn't want to overcrowd the front so stamped the sentiment on the inside in Evening Evergreen and stamped the little greenery stamp along the right hand edge in Soft Succulent.

 
I cut the little greenery bits in Soft Succulent and Evening Evergreen and layered then and attached with a dimensional on the right hand side to act as a stopper for the card front.


This was a quick but also fun card to make so simple but great impact. 


Don't forget all orders of $50 or more placed between now and 31 December 2021 will receive a gift if the hostess code is used.

Hostess code CZKS4A2V

Go to 
www.mette.stampinup.net to shop now


Happy stamping

Hop participants: 

Mette (Australia) this is me :-)

Astrid Hofmann (Austria) 

Teresa Milke-Steinman (Canada)